


Making of GH House by Ivo Sucur, Part 2
Part 2 of Ivo’s making-of is here! In part 1 Ivo described the creation of the various models and their textures. This time he will explain about the lighting, rendering and post production done to transform the raw 3d render into his final images for the challenge. I hope you’ll enjoy this article, learn from it and share your thoughts by commenting at the bottom of this article’s page.
Use the green retweet button above to share it with your twitter followers too!
 Author: Ivo Sucur
Ivo participated in the GH House Challenge, winning 2nd Runner Up Award for his entry. In this article, He describe the process of working on his images. Check out his website at – http://ivosucur.com/
In part 1 I described the different models and textures used in my scene. This time I’ll get into more detail about the lighting, rendering and post work done to transform the raw 3d render into the final images.
Image Based Lighting (IBL)
From the beginning the idea was to put the construction site into a dusk scenario, thus giving all the attention to details but at the same time not to distract the viewer from the house itself. After some experiments, I’ve decided to use an EXR image created from a free HDR image found on openfootage.net website. I think there are many other ways to do this, but this is my usual workflow and I hope you will find it useful for you too.
For the exterior and interior shot I used two different HDR images (10000X5000) converted to EXR with an excellent free software called Picturenaut. Before the final shot I used a small version of the HDR/EXR image to reduce memory usage and to gain a fast draft results. Be sure that for the final renders you use the large resolution image unless you want to loose your background details. When you’re importing an EXR image into 3ds Max, choose Real Pixel Float (32bit) from the Open EXR importer settings.

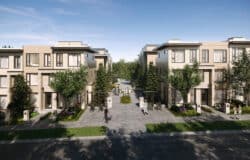
Exterior shot background image
When the background image is chosen, in my workflow, the next step is to create a VRayDome light and assign an instanced EXR image to the lighting texture map slot. Finding appropriate horizontal position for your light could be easily done with assigning the same EXR image in your material editor to the viewport background just to show the desired position. Tip – If you’re using this workflow you must use the same EXR you used for the dome light because this new position will be automatically assigned to the light source.
After you’re satisfied with your final settings, make sure that the use map check-box in your 3ds max environment in unchecked. Your VRayLight dome should have unchecked option Invisible if you want this chosen EXR to appear as an environment.

Setting EXR image for a background image

Setting EXR image for a light source
For the Interior shot I used the same logic to setup environmental lighting, but instead of the dusk scenario used before, this interior shot was lit with a different EXR image. The source for this image is also openfootage.net website, and I only switched the previous map used in the VRayDome light.

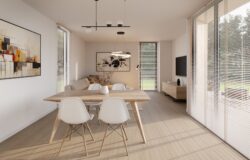
Interior shot background Image
The next step were test renders in order to check the overall lighting scheme. In this case I always use a mid gray VRay material, with VrayEdgesTex applied in the diffuse slot just to make a simple geometry test. When using this settings, draft renderings can be really fast.

Clay test render
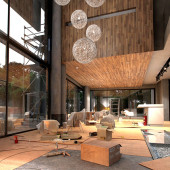
Additional interior lights sources
One VRayDome light usually is not enough for gaining cleaner results fast from interiors. In my workflow I always try to use additional lights like I would use them in real life. The best thing about VRay lights (I use those here on my spotlights) is that you can control intensity values by giving them Luminous power, Luminance or default units. In this interior scene I used VRay sphere lights for the pendant lamps, VRay plane lights for the pebble canals and VRay IES lights for the spot reflectors.

Interior clay test render
For the spot reflectors you can even download 3d models and IES files together for giving an exact result. You can find the model and all the details I used at ERCO website. By populating the scene with lights, you should take care the way you control your lights in the scene. Using different names could be useful if you plan to have dozen of light sources. For this purpose I am using 3dZver’s light lister script you can find on scriptspot. Some lights used on the scene are photometric lights used with custom IES files.

IES Light Settings

Light Lister Interface
Render settings
Last step in this construction environment was setting up the cameras and final output. For the exterior dusk shot I decided to use camera sensitivity 200, f-number 4 and played with shutter speed until I was satisfied. One remark from the GH House jury was that the overall impression was a little bit dark, so this can be solved with higher ISO settings and more tests with shutter speed (Another method is gaining more brightness and exposure control in Photoshop).

Exterior camera viewport
Interior camera settings include some small variations achieved with shutter speed and post processing.

Interior camera viewport
I used the same render settings for Exterior & Interior.

Render settings
Post Production
Not to much post production done for this GH House 3d render entry, just some CA and leveling for the interior shot and some exposure corrections and leveling for the exterior. I always use an AO pass to boost some shadows and corner details, top layered in Photoshop with layer blending mode set to multiply (20-50%).

Tweaking the exposure

Tweaking the lens filter
As a general rule I also output some channels out such as material id, z-depth, reflection & refraction to allow for more freedom in image editing rather the re-render for corrections.

Material ID Channel

Z-Depth Channel

Refraction Channel

Reflection Channel

Material ID Channel

Z-Depth Channel

Refraction Channel

Reflection Channel
I hope you enjoyed this article as much as i did writing it! Ivo.
Ivo’s GH House Challenge thread
You are welcome to comment on this article and ask questions using the comment box below!


Ivo, brilliant “making of”. Really helpful, especially the HDRI tips.
My only question is, how can I view a higher res version of your render settings please? When I click on the image it is still not large enough to see what settings you’ve actually used.
Thanks!
Paul
Hi Paul,
i think that Ronen adjusted the screenshots to fit web standards and for various screens, but if you have some issues seeing the details, please p.m. me within the forum and i’ll send you direct link for highres screens.
Cheers
Ivo
Right mouse button over the image and click open in a new window or something like that… depending of your internet navigator.
Excellent work!
Congratulations!
Beautifull renders and awesome work, im learning a lot with all of you guys. Ivo im looking forward to see you website finished.
Thank You.
J.Pintor
Hi there Javi, thanks for your kind words and i am glad you found my article useful. I am trying to synchronize my work and free time for website finishing, so i hope in couple of weeks it should be done..
Cheers
Ivo
This is my first time to visit this site and the tutorials are amazing especially from professionals like you Ivo. Thanks very much for bothering your self and explaining the long Process but it’s worth it the result is great and the rendering is fantastic… thank you again and I hope to see another tutorials from you.
My best regards!
Hi Hussein, I’m glad you liked the making of. Eventually all the 3d artists gather their knowledge from everywhere, so contributing in this competition and new “know-how” online community is kind of “giving back” and sharing.
Thanks again
Cheers
Ivo
It’s just a fantastic result! thanks for sharing your tips, it’s very well explained and the result is fantastic.
you should have gotten the first place, the idea is great and the result amazing in it’s realism!
My best regards.
Thanks Alvarez for your kind words, i’m glad you like it..
Cheers
Hello Ivo,fantastic work,very detailed and helpfull tutorial.already tried (i m a begginer)
one question,
what about the gamma?it is 2,2 but is it on the max gamma and lut settings also 2.2?
Thanks for sharing
Regards
Giorgos