


Making of House to Catch a Forest
I’m happy to bring you a new making-of article by forum member Celestino Geronimo. In this article he will describe the creation of his scene inspired by House to catch the forest / Tezuka Architects. I hope you’ll enjoy this article, learn from it and share your thoughts by commenting at the bottom of this article’s page.
Use the green retweet button above to share it with your twitter followers too!
![]()
Celestino is General Manager at Mushroom Multimedia located in Singapore. Check out what they do at their website – www.mushroommultimedia.com.
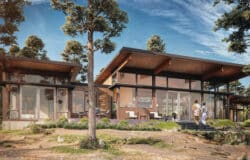
This is my interpretation of a Tezuka House by the forest, played with different foliage types as opposed to the original site itself. My intention was to achieve that “forest” look with lush vegetation while preserving the focal point which is the design of the house itself. It was a simple 3D exercise which I did to pass the time.
First let see how we end up…

Clay render

The final render
Preparing the Scene, Setting the Ground Work.
I prepared the site with a plane as the base, pulled some vertices on the z axis to achieve an uneven terrain. This will create the rolling effect especially in the background areas of the scene. The ground is applied the grass material, then proceeded with the house structure itself.

The site
The house structure itself was not that difficult to create, it is mostly comprised of extruded splines (the walls and floors) or editable splines (such as the rails). As a rule I try to use the simplest mesh as possible so as to allow me more flexibility in editing in later stages. I only resort to polys on a case-to-case basis. Furniture for the interiors is a separate issue.

The house
I always choose a texture which has a good tiling quality and not obviously repetitive when rendered. Also as a rule I try to avoid using high resolution textures if the scene does not showcase them close enough. For example, the concrete material I used was some random mid-res set of concrete textures which I cropped in the material editor and it is more than enough to suit my purpose in this exercise.

Timber material for flooring

Timber material

Concrete material
Assigning the Grass Material
I then applied the grass material as shown, I intentionally modified some patches to show some ground textures rather than full grass alone, to achieve a more natural effect.

Grass material
Adding a Grass Displacement
Using the same bitmap, I added a VRay displacement modifier to the ground mesh.

Grass displacement
From this point onwards, all plants and trees come from pre-existing tree libraries such as evermotion which were generously shared by some friends.
Adding 3D Grass Elements
To enhance the scene further I opted to use 3d grass meshes with the material applied as shown in the image. The grass was applied with a gradient material, with a texture map applied in the middle tab, as shown. These were the default settings of the grass mesh. No UV Map was applied.

Grass strands
Rocks
The rocks were placed and assigned the material as shown in the image, with a bump value (100). Some of these rocks are available in preset libraries, but these were modeled using poly’s. The texture is also as shown in the image.

3D Rock
Supplementary 3d Plants
The scene was then peppered with various species of plants. These models are all preset including their materials, however to add more realism to the final output, I opted to follow the next step

Sample 3d plant
Plant Glossies
For most of the plants that I used in the scene, I have applied a glossy reflection to the leaf materials. A value of 20,20,20 in RGB is what I used in this instance.

Plant glossy reflections
3d Trees
The forest trees were then inserted into the scene, with the default material applied. However, similar to the plants, some parameters were added.

3D Trees
Tree Glossies
Similar with the low plant leaves, glossiness was also added to the leaf material as shown. Also in 20,20,20 in RGB.

Tree glossy reflections
Other Tree Settings
Also incorporated a refract value to the leaf. RGB 30,30,30 in this example. These settings were all default to the tree mesh when it was obtained from the 3D library. Translucency and bump are as illustrated below.

Tree glossy refractions
Tree translucency

Tree bump
Scattering the Trees and Foliage
I have not been able to use VRay Scatter for this exercise, just manually populated the scene with the plants and trees where I see fit. It is important to make sure that the proxies and/or 3d plant meshes had their anchor points slightly above the ground level to allow for some “submerging” of the meshes below the uneven terrain.

Scattering pivot point
After making sure all the plants are in their proper pivot points, I proceed to scattering the plants. The obvious method is of course to create one instance, select both, then instance (hence 4), etc. which is simple multiplication of the objects.

Scattering the plants
After populating you can see that they are all in the same z axis. In order for these objects to align with the ground plane, I used a tool called scripted glue. It’s quite easy to use. This applies to all of the plants and trees in the scene.

Positioning plants above plane

Plants after glue script
There is also this neat tool from called randomizer-0 which randomizes the size and rotation and even the scale of selected objects. A helpful script to randomize the foliage.

Trees & plants after scattering & randomizing
Lights
Lighting for the scene is pretty straightforward. Using VRay Sun (with the default VRay Sky environment), a general VRay light for the ambiance, and an interior yellow light was all that was incorporated into the scene.
Light Settings (all using 8 subdivisions only)
")
Interior VRay Light

Exterior VRay Light

VRaySun Light
Camera Setup
Nothing fancy here. Just used a standard camera with the following settings. In Rendering however, I used the blowup option to render only the area of concern in the scene.

Camera settings

Camera render blowup
Render Settings
Mostly default. I experimented with Reinhard for the color mapping, quadratic as AA and 1,6 for the DMC settings. The rest are as illustrated below.

Render settings 1/4

Render settings 2/4

Render settings 3/4

Render settings 4/4
Also applied an HDRI map to the reflection slot. The map was obtained from a good source of free HDRI maps: http://www.hdrlabs.com/sibl/archive.html

HDRI for reflections
Rendered Output and Post processing
Finally! Got the raw render after a few hours of waiting. The resolution was 2500 pixels and took almost more than 8-10 hours to render (the price I had to pay for extreme glossy materials). Here’s the initial output below.

Raw render
Decided to add a sky bitmap background to enhance the scene. The result below.

Sky background
Still not entirely a good sight because the sky needs more tweaking, and the overall effect is a bit dark in the shaded areas. For this, I applied some postwork, using mostly curve adjustments.

RGB Curve

Blue curve

Green curve
Finally, played with a few shots and cameras…

Second exterior POV

Lantern version inspired by Alex Roman
Celestino’s original forum thread
You are welcome to comment on this article and ask questions using the comment box below!


Amazing work! This is the result of years of practice and dedication to your craft. Attention to details and techniques are inherent in your work. More power and Godspeed!
Thanks Jun! Always have looked up to you since the early days man. Goodluck and hope we see each other again soon.
Thanks for the tutorial and good work mate.
Thanks Gavalakis!
Even though I use Blender I find such articles very inspiring and looking at someone’s way of doing stuff is really worth looking at.
Thanks Jacek for the encouragement!
Very inspiring work sir Celes! This is one for the books!
Thanks ortzak 🙂
Nice tutorial, I have a question… why didn’t you use the LWF settings on this scene, VRay frame buffer and VRay camera?
I was kind of new to LWF when I did this, so I chose to use the old gamma settings. I also did experiment with Vray physical camera in the night scene. I think it’s a matter of whatever way / tools that would give you the results you want. 🙂 I guess I just chose to use the old tools that’s all.
thanks celes for this tutorial… very inspiring!
yo cgil, thanks for dropping by sir!
I bought archexteriors 11 and this exact house is in there.. did you model it for evermotion.
this house is different, i modelled it from scratch, im pretty sure there are a lot of differences from the one in arch 11 and my version. thanks!
HI, Its a great One… let me know what is the Configuration of computer. Because I always stuck with render trees like that environment. pls tell me what kind of computer need for this. or setting.
the specs of my computer are a quad core machine with 8gb RAM running windows xp 64 bit. it’s quite an old rig, about 3 years old.
Hello,
Excellent Work and many thanks to share with us.
I really admire the green environment you created around the house. Excellent Work!!!
Keep it Up.
Hi,
Awesome pic congrats !
Just noticed you left the default memory setting in the “Settings” tab under “Vray:: System”. If you have 8 Gb, you should put 8000 in the “Dynamic Memory Limit” and choose “Static” from the “Default geometry” drop-down menu. Your light cache pass should be faster this way.
Regards
Rémi
Thanks Celestino
Great tutorial with lots of inspiration. And I agree, your model is greatly different than the Evermotion model – I also purchased this Volume.
Results from this Tutorial:
http://i51.tinypic.com/j6h4cn.png
http://i51.tinypic.com/k3vxx5.jpg